Thursday, December 22, 2011

The One with the Christmas Tree

Happy Christmas and Merry New Year!! Wishing you a wonderful holiday and the best to come in 2012!

I know I promised a holiday craft, but it has been a rough couple of months with unplanned events popping up. The creative juices have been stomped out by sad things. I know this will lift, and there will be more cooking and crafts to come in 2012, so please stay tuned!! 

Lucky for anyone reading this blog, I did pick up an awesome tree lighting technique this Christmas. I do not have any real good "how-to" imagery for this, but hopefully my written word will be helpful enough. Instead of lighting around your tree in repetitive circles, which takes time to put up and take down (and makes you dizzy), divide your tree into three vertical sections. Light your tree from top to bottom in these chunks. It will take less than half the time and it still looks amazing! It is incredibly easy and very fast. This was such an awesome time saver this year (thanks again to the awesomeness that is Pinterest). Here is a picture of what my tree looked like once lit. There are decorations on it now, but not in this picture. Enjoy!!

Craft Rating: Beginner


Sunday, November 6, 2011

All Hail the Mighty Pumpkin


I am a big fan of pumpkin and all pumpkin flavored things. As soon as fall rolls in, I begin searching for anything and everything I can get my hands on that has pumpkin as an ingredient. I have even succeeded in finding Pumpkin Pie Pop Tarts, no kidding. They aren’t half bad either. Anyway, back to the main event. My favorite pumpkin recipe thus far is the pumpkin whoopie pie with cream cheese filling. This is the best fall dessert, in this humble baker’s opinion. I started making these a few years ago as a Thanksgiving treat. It is a Martha Stewart recipe that my best friend’s sister posted on her Facebook wall (Thanks, Meli!). I immediately swiped it. I think I made them within the week, and have been making them ever since. They are fun, easy to eat at parties, and most of all delicious. First I will start with the recipe and then we can walk through it together.


Ingredients
For the whoopie pies:
3 cups all-purpose flour
1 teaspoon salt
1 teaspoon baking powder
1 teaspoon baking soda
2 tablespoons ground cinnamon
1 tablespoon ground ginger
1 tablespoon ground cloves
2 cups firmly packed dark brown sugar
1 cup vegetable oil
3 cups pumpkin puree, chilled (2 15 oz cans equals 3 cups)
2 large eggs
1 teaspoon vanilla extract

For the cream cheese filling:
3 cups confectioners' sugar
1/2 cup (1 stick) unsalted butter (room temperature)
8 ounces cream cheese (room temperature)
1 teaspoon vanilla extract


First things first, preheat your oven to 350 degrees. Line a baking sheet with parchment paper or a baking mat, like a Silpat.

In a large bowl sift together your flour, salt, baking powder, baking soda, cinnamon, ginger and cloves. Set aside. I know sifting seems like a pain, and honestly you probably do not have to do it but I find that the result is an evenly mixed batter and a much smoother product. So, if you have the time - always sift. In another bowl mix together your dark brown sugar and oil until well combined. I suggest using your KitchenAid or hand held mixer for this bowl. Add the pumpkin puree and whisk until combined. Add eggs and vanilla and whisk until well combined. Remember to scrape down the sides of the bowl after every addition. This way you make sure everything gets incorporated into your delicious mixture.
In stages, add your sifted flour mixture to your pumpkin mixture. I do this in one cup chunks sprinkled over the top of the pumpkin mixture, mixing well after each addition. Start your mixer on low or you will be covered in flour and spices and you will smell like a pumpkin pie. Maybe that's your thing. You really want to make sure to scrape down the sides of your bowl with a large spatula during these additions. Once you do all this you will have something that looks like this (it is a wet batter):


Using a small ice cream scoop (picture below) with a release, drop the batter onto your cookie sheet about an inch apart. This batter does not spread much when it bakes, but you still do not want to have to separate a bunch of cookies. There is an example of this below as well. This batter will appear to make A LOT of whoopie pies, but remember you are making a sandwich.


Now throw these bad boys in the oven for 15 minutes. To make sure they are done test them with a toothpick in the center. If the toothpick comes out clean, we are good to go. Let them cool completely on the baking sheet and then transfer to a wire rack. Here is what they look like when they are done baking:
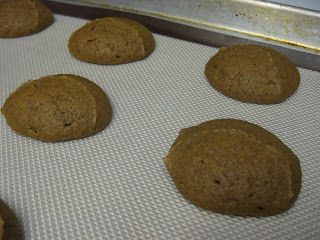


Next up we get to make the filling. This is a fairly straight forward cream cheese frosting recipe. In your mixing bowl mix together the butter and the cream cheese until they are well combined with no lumps. Sift the powdered sugar into the bowl in one cup chunks, mixing after each addition. Keep the mix setting on low at first, much like the flour if you kick this up to high gear you will look like a snowman. Add the vanilla and mix until everything is just combined.
Once your cakes are completely cooled, it is time to assemble them. I use a regular kitchen spoon and eyeball about a tablespoon of filling for each cake. This part is pretty much up to you, I do not think there is any hard and fast rule about how much filling you put in your whoopie pie. However, the more filling you scoop into your whoopie pie the messier it is to eat. The Martha Stewart recipe suggests refrigerating the whoopie pies for 30 minutes before serving, but I have never done this and I do not see the need.


Voila! You have now made pumpkin whoopie pies! Take these to any party during the holiday season and you will be the most popular person there. Also, if you are a chocolate lover try adding a cup of mini chocolate chips to your batter. These are also amazing frozen, straight out of the freezer.

Baker's rating: Intermediate

Wednesday, November 2, 2011

I Promise to keep up on this blog!

Hey everyone, I realize I started this blog with great gusto and then immediately fell into obscurity. I do apologize. October has been quite the busy month of bachelorette parties, bridal showers and boyfriend 30th birthdays. I planned all three of those events, and once the birthday was over I quite quickly got a pretty gnarly head cold. But do not fret! I promise to have a new post soon with tips, tricks and suggestions.

It is November now which officially starts the holiday season and my listening to Christmas tunes. November also just makes me super excited and crafty so there will be lots to come. You can check out how I feel about the holiday season: here (I am pretty intensely dedicated to the holidays).

To wet your whistle and get you excited, stay tuned for a holiday themed dessert and a Happy Christmas burlap pennant decoration for Christmas. It will be good!!


Friday, October 14, 2011

The Ribbon Wreath

Not too long ago I threw one of my close friends a bridal shower. As one of the decorations/gifts for the bride, I created a wreath that was inspired by hours of surfing Pinterest's DIY section. The ribbon wreath: a simple and easy way to add color and decoration to an event, room or front door.


Major fail on my part, I got all artsy with my photography and forgot to snap a shot of this in color. Boo. None the less, I chose three main color schemes to work with. In this case it was easy because I stuck with the bride's color scheme: burgundy, cream and black. But imagine the possibilities, you could do whatever combinations you want for endless outcomes! I went to Joann's and chose a wide variety of ribbons at all different widths (I think I ended up with a total of 12 spools. For the future it might be better to find ribbon wholesale somewhere else). I used the wider widths for filler. I also picked up an 8" wire wreath. I cut all the ribbon in 6" strips and simply knotted them around the wire frame starting on the two inside loops, then I moved outward alternating all the ribbons. I also purchased the monogram at Joann's and painted it cream.


This is a time consuming craft, but easy to do while watching TV and relaxing. I had a lot of fun putting it together and I really think it added a simple, sweet touch to the shower.


Craft rating: beginner.

I have a love affair with all things kitchen/craft related

I grew up watching my Dad. He did a lot of things well. He gardened, he futtzed in the garage, and he cooked. Cooking and baking bread were probably at the top of his wheel house. I took after him, this was a playing field where I could actually connect with him on the same level. Except for the bread thing, that is all his and he is excellent at it.

Following in Dad's culinary footprints created a monster. I love the kitchen. I like to bake, cook, and experiment. My Mom can attest to my years of experimentation. I broke my fair share of utensils and baking stones, almost burnt out a KitchenAid motor, and left the kitchen in shambles. However, I think that all paid off. I am not a terrible cook if I do say so myself. In fact, I am probably a pretty decent one.

Of my own volition, I am a pretty crafty person. I like to scrapbook, I sew at a very basic kindergarten level, and I have recently entered the world of gift baskets and wreath making. I enjoy taking the creative leap and seeing what comes of it. With the advent of Pinterest and other crafty DIY sites, I decided to start this blog and report on the recipes and crafty things I try. I will let you know what I think and what I changed about said recipe/craft.

The name "The Nutella Files" comes from the simple fact that Nutella is amazing and should be served on almost anything. :)

I said I try almost anything, but if a recipe calls for yeast I have no patience. I do not use yeast. It is just too much work. Maybe someday.